
Your photos. Your reunion story.
Where can I make a zombie couple video, and how?
Use Zombie Couple to make a reunion, embrace and happy-memory video from two separate portraits. This guide walks you through our studio, from choosing a story and assigning the photos to checking credits and downloading the result. No prompt writing is needed.
Content updated
A website and a clear way to get started
Use the Zombie Couple studio on this page. For the default story, prepare one portrait of each adult: Person 1 is the survivor and Person 2 is the infected partner. Sign in before uploading, select the story, review the quote, then generate and download a successful result. Watching a reference is free; creating your personalized video uses credits.
What photos are you starting with?
I have one couple photo
This studio does not accept a shared photo. GoEnhance describes an effect that accepts both people in one image and assigns the infected role automatically.
Check the one-photo workflowI have two separate portraits
Use our studio with one photo per person. In the default couple story, the first person survives and the second is infected. No prompt writing is needed.
Create from two portraitsI want to write my own scenes
Media.io provides role and shot prompts for compatible models. Our studio uses ready stories and does not expose a custom-prompt field.
Compare the prompt-led workflowWhat kind of zombie couple video will you make?
This walkthrough uses “When I said forever,” the default couple story: recognition in a dark room, an embrace and a warm beach memory. One partner is infected in the present. It is not a preset for turning both people into zombies.
Recognition in the dark room
The survivor recognizes the infected partner. The story directs the survivor to lower the weapon without firing.
An embrace
The pair comes together. Both uploaded identities should remain recognizable as their faces turn and their bodies touch.
A warm beach memory
The embrace cuts to an earlier happy scene with both partners healthy. This is a memory, not a cure in the present.
These are the preset’s intended events. Shorter settings can compress or omit actions, and no duration guarantees an exact reconstruction.
Prepare two separate portraits
For this walkthrough, use one adult per photo, with a visible face, even lighting and minimal obstruction. Use photos you have permission to upload. The photo fields identify the people; they do not replace the story or choose a new ending.
- Files this studio accepts
- JPG, PNG, WebP, HEIC and HEIF; up to 5 MB per file. Each side must be 300–6000 pixels, with a width-to-height ratio of 0.4–2.5. iPhone HEIC/HEIF photos are converted in the browser; if conversion fails, export a JPG or PNG and try again.
- If you only have a couple photo
- This studio has two individual-photo fields and no shared-photo mode. Prepare separate portraits rather than uploading the same two-person photo twice. If you need a one-photo workflow, see the alternatives after the tutorial.
Who becomes the zombie? Put each photo in the right field
The default story uses fixed upload roles. Check the labels before submitting; there is no separate “who becomes the zombie” switch.
Person 1 · Survivor
Upload the adult who remains alive in the present-day scene.
Person 2 · Infected partner
Upload the adult who is infected in the dark-room scene and healthy in the earlier beach memory.
To reverse these two adult roles, exchange the portraits between the fields before generating. Other available stories can have different casts or endings; follow their labels. Role instructions guide the model but cannot guarantee a mistake-free result.
How to make your zombie couple video: six steps
For a concrete example, keep “When I said forever” selected and use two adult portraits. Follow the button names below in the studio on this page.
Actual English studio screenshots. Credit totals in the images are examples from that configuration; check the quote beside your own Generate video button.
Sign in, then choose the story
Use “Sign in” before uploading your photos; signing in reloads the studio, so plan to add the photos after returning. In “Choose a template,” play the reference and keep “When I said forever” selected. To use another available story, press “Use template.”
The story title appears above the upload fields. An upcoming story cannot be selected for generation. Watching or selecting a reference does not start a paid job.
Go to the studioUpload one portrait into each labeled field
Put the survivor’s portrait in “Person 1 · Survivor” and the infected partner’s portrait in “Person 2 · Infected partner.” Check the names and thumbnails; replace or remove a photo if needed.
Two separate thumbnails appear. The default story keeps these roles fixed; swapping the portraits before submission reverses who plays each adult role.
Find the upload fields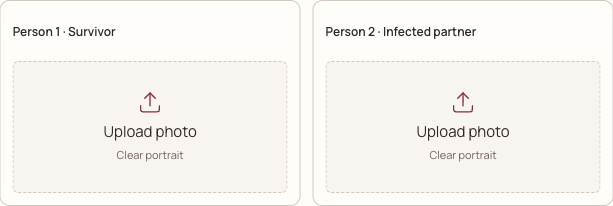
Actual Zombie Couple studio upload fields labeled Person 1 Survivor and Person 2 Infected partner Review Model & settings and the credit quote
Open “Model & settings.” Keep the defaults or choose a model, Length and Quality. This studio uses portrait 9:16 output. The credit total updates as settings change.
The selected model, length, quality and credits are visible before you submit. Use the specifications below to understand the choices; the studio quote is the amount to check.
Read the current specifications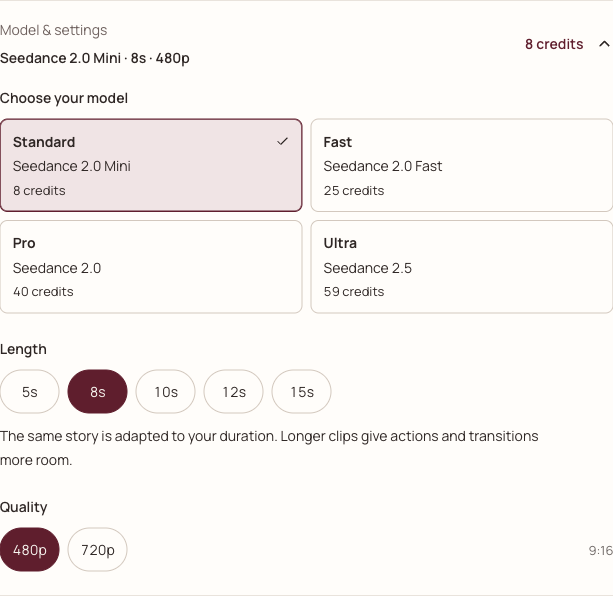
Actual expanded Model and settings controls showing model choices, video lengths, 480p and 720p quality Confirm permission and press Generate video
Confirm you have the right to use the photos and consent from everyone pictured. Review the credits beside “Generate video,” then press it once. If your balance is insufficient, review the pricing page and purchase only if you want to continue.
The studio checks the submission and shows task feedback beside the button. Generation requires sign-in, available service configuration and enough credits; uploading photos alone does not submit a video job.
Review the generation formFollow the task and review the full result
Follow progress beside the generation button or open “My videos.” Wait for a successful result, then play the complete video with sound. Check both faces, the embrace and the transition into the memory.
The completed player and download control appear after success. A connection error does not prove the task failed; check its status before starting another paid attempt.
Open My videosDownload and play the saved file
Use “Open / download video” below the successful result, or the same control in “My videos.” Open the saved file and check its sound, framing, ending and any provider markings before sharing.
You have checked the actual saved video. Built-in matching music is added during finishing; this guide does not promise every provider output is watermark-free.
See the result checklist